Pages

Wednesday, April 30, 2014

Lola Tanks

When I made those awesome elephant MC Hammer pants for my nieces (remember those?), I didn't really anticipate that it would be impossible to find tops to match, but it was.  So I made some instead!

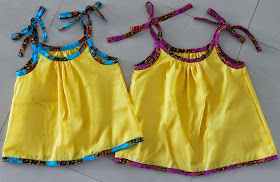
I had some bright yellow cotton that exactly matched the yellow in the elephant fabric, but I wanted to tie in more of the elephant fabrics into the top, too.  I found this (free!) pattern and tutorial for the Lola dress from Climbing the Willow (of Izzy top and my Liebster award nomination fame!) and thought it would make cute tanks to go with the elephant pants if I left off the bottom ruffle.


I made 1/2 inch double fold bias tape (starting with 2 inch strips and following the directions at Colette) from each of the elephant fabrics and then made the Lola tanks according to the tutorial, although I left the armhole bias tape long enough to tie into bows at the shoulders to keep them adjustable (I left 13-14" of bias tape hanging off the end of each point on the tank).  I also bound the bottom hem with the elephant bias tape.  The pink/purple is size 3 and the blue is size 2.


Super easy and very cute!  Definitely take a look at the Lola pattern.  

In the meantime, can you picture how the Lola tanks will look with their respective elephant pants?:

Saturday, April 26, 2014

Me-Made-May Pledge!

This year, for the first time, I have decided to participate in Me-Made-May and take the pledge.  While I have followed the Me-Made-May-ers for the past few years, it wasn't until this year that I felt I had a sufficient me-made wardrobe to join in.  As Zo, the organizer of the challenge, states, Me-Made-May is "designed to encourage people who sew/knit/crochet/refashion/upcycle garments for themselves to actually wear and love them."

Now I've built up a pretty good stash of me-made stuff.  Mostly tops, both casual and work-appropriate, but a few dresses and a couple pairs of pants.  I think I know in advance that I could probably incorporate more real (i.e. non-elastic waist) pants and a couple skirts into my me-made wardrobe.  I think this lack of self-sewn bottom coverings may have something to do with my continuing fear of zippers. 

Anyway, here's my pledge!!


I, Meg of cookinandcraftin.blogspot.com, sign up as a participant of Me-Made-May '14. I endeavor to wear at least one item of me-made clothing each day for the duration of May 2014!

I also vow to document my me-made outfits every day and post about them at the end of the week. 

Woooooop!

Monday, April 21, 2014

Tumble Tee, Take 2!

Ah, the Tumble Tee might be my new "palate cleanser" project.  You know, perfect for when you're working on another, more complicated and/or frustrating project, but you need a break... something simple and refreshing and quick.  The Tumble Tee is perfect for that, I've just discovered.   


I was working on another project (the new Soleil dress from Selvage Designs, which is awesome!), but my serger decided to act up on me and try to eat the dress (which was 95% finished).  I freaked out and needed to step away from it for a few days.  But I still wanted to sew... another trouble-free Tumble Tee was just the ticket.  After the little win from whipping out the Tumble Tee, I regained the patience necessary to try to fix my stalled project.


This Tumble Tee, like my first, is made with vintage knits from my mom's stash: a fun squiggly aqua knit.  I paired it with some white knit I cut out of one of Tim's old t-shirts. Love it!  I hope niece Anna likes it, too!
the back...

Thursday, April 17, 2014

Comox Trunks!

Like I said, I've been slowing making my way through the Thread Theory catalog of patterns for men (my Newcastle here and my Strathcona here!). When they announced a sew-along for their latest pattern, Comox Trunks, it was perfect timing for me to join in!  Sewing mens underwear is a little weird, maybe, but fun anyway!  And potentially useful, since this is the type of undies Tim wears anyway.

(PS, as an aside, it's totally worth clicking the Comox Trunks link to check out the male models... wowza.)

the front
My fabric for this pair, sort of a wearable muslin, is actually an upcycled skirt of mine: a 6 gore Target skirt that I never wear anymore.  The fabric is 95% rayon and 5% spandex: super soft, good stretch and recovery.  I had 2 problems using this fabric: finding the grain and ending up with a butt-crack seam due to fabric limitations.  The elastic is from a pair of Tim's underwear that he was planning to toss. I just hacked the waistband off and repurposed it for these Comox trunks.

Understandably, I couldn't convince Tim to model these new undies for the internet.  There is not enough craft beer in the world (craft beer being his modeling bribe of choice).

the back

My thoughts on/adjustments to the pattern: 

- The pattern was surprisingly easy and very quick to put together... somehow I thought it would be more complicated and scary.

- The only speedbump I had was attaching the waistband... lining up the right side of the trunks with the wrong side of the waistband with a consistent amount of overlap while also easing in the excess trunk fabric was a beast.  Mine is a bit of a mess.  I think it may have something to do with my repurposed waistband. But this pair is definitely a rough draft/muslin, so hopefully I'll get it right next time.

- I customized Tim's trunks as described in the sew-along: I removed the "fly exit." Tim said he doesn't use it and not including it simplified the sewing process, so win-win, right?  I kept it a double layer, as recommended.  Worked out just fine!

- Other than that, the fit seems quite good!  The only challenge for me will be finding the proper fabric and elastic here in Bangkok.  I may have to place some online orders.

Tuesday, April 15, 2014

Selvage Designs Soleil Dress

I can't remember how I stumbled on Lauren Dahl's blog and her brand new sewing pattern, the Soleil dress, but I do know that it was love at first sight: how cute is this dress?!  I love the little opening in the back and the pockets.  Check out all of the cool versions from her pattern testers.  I snapped up the pattern immediately after it was released and set about making it for Anna, whose birthday quickly approaches.


I used two fabrics from Joann, both of which I've used before (both Bimaa sweaters: hearts here and purple rib here).  They don't exactly match, but go well enough!  The purple was all I had in my stash for ribbed fabric and I haven't seen any ribbing around Bangkok (not to say it doesn't exist, I just haven't found it yet), so that's what I went with.

The pattern was pretty easy to put together; the directions were very good!  My only complaint: I found the guesswork about how much or how little to stretch the ribbing to be a little perplexing.  Without a kid at hand to try the dress on, I'm not sure how successful I was, but we'll see!  I ended up putting in the arm binding flat, but the neck binding in a circle.

I did have some trouble with attaching the skirt: my serger was overwhelmed by all the gathers and decided to retaliate by eating the dress.  Uuuuugggg.  After I carefully picked the dress out of the machine (it was wrapped around both loopers!), I was eventually able to re-serge it.  I think I may have stretched out the waist band something awful, though.  We'll see!  Hopefully it's still wearable for Anna!  Looks pretty cute on the hanger, eh?


Saturday, April 12, 2014

Stripes and Flowers Tumble Tee

I've had the Tumble Tee from Rachael at Imagine Gnats in my constantly growing pile of patterns for a while now (thanks, Sew Fab pattern bundle! I am counting the days until the next bundle is available!) but just hadn't gotten around to printing it up and putting one together.  Now that I have I am kicking myself for not doing so sooner!  So cute and so ridiculously simple to make.  Literally one hour from start to finish (and that included unpicking a messed up serged seam, too!).

The front.
I was inspired to sew it up after obtaining a giant pile of knits from Martha's prodigious stash... lots of fun prints (like this one from which I made my Skater dresses) and stripes, just begging to be mixed and matched.  And mix and match I did: a multi-colored floral and some hot pink and white stripe.

The wrinkly, not so straight back.
My Tumble Tee is a colorblocked tee exactly according to Rachael's instructions.  Maybe I made the foldover for the neckline and armholes just slightly larger (closer to 1/2") to accommodate my twin needle, but otherwise, pretty straightforward!   Can't wait to churn out some more of these cute little tees!

This one I made for Baby Zoey here in BKK... I made her Tumble Tee in the 12 month size, but she's a skinny almost 10 month old, so it's a wee bit big right now.  It works as a dress, though, and looks super cute on her:


Friday, April 11, 2014

Ginger Mojitos for a Crowd

These days the cooking posts seem to be few and far between on this old blog... as I said before, our situation in Bangkok (awesome and cheap food abounds... plus our kitchen is a bit small and stuffy) is not conducive to lots of cooking.  But refreshing cocktails? Yes, please.  Happy Friday!


We had some folks over last night as part of a mini progressive cocktail party in our apartment building. We were stop #2 for the roaming party, so I needed a make-ahead cocktail for a crowd so I wouldn't have people tapping their feet while we mixed individual drinks.  After some Googling (good resources on big batch cocktails here and here) I landed on this ginger mojito recipe because it sounded tasty and easy, but also because I knew I could find all of the ingredients here in Bangkok.

Tasty and easy it is!  You basically make a ginger mint simple syrup and then mix it with lime juice and rum and top it off with soda water.  For the party I put the simple syrup/rum/lime juice mixture in my punch bowl (love any opportunity to use the punch bowl!) and instructed people to pour a ladleful of mix into their glass, then add as much or as little soda water as they wanted and garnish with a sprig of mint and a lime slice.

Everybody seemed to like the mojitos! The flavor is a little bit more subtle than a traditional mojito, probably because the muddled mint leaves are not hanging around in the bottom of your glass.  And the drink is not overly ginger-y, but has just a nice hint of ginger.  Really refreshing and perfect for a small party!


Wednesday, April 9, 2014

Natty Newcastle

I am working my way through Thread Theory's catalog of men's sewing patterns in order of difficulty... I started with the Strathcona t-shirt for Tim and now I've stepped it up a notch and made the Newcastle cardigan, which is the pattern that drew me to Thread Theory in the first place.  It's so cool... there is nothing like it out there, certainly not amongst the Big 4 pattern makers, whose men's catalogs seem to consist mainly of a couple button-downs, some pajamas and the occasional muumuu/dashiki/cult robe.


I used some charcoal grey ponte de roma as the main fabric and some complementary navy for the contrasting yoke and shoulder panels.  Both fabrics are part of the Sew Classic line at Joann... be careful, though, as some of the ponte there is 100% poly and might be the worst thing I have ever touched. Shudder.  But the stuff I used (a rayon/poly blend) is super soft and easy to work with.  Buttons are also from Joann, as is the stretch interfacing.  Warning: stretch interfacing only stretches one way... I couldn't fit all the pieces on what I had, so I had to cut the collar pieces the non-stretchy way, figuring they wouldn't get too much stress.


Topstitching... woop!
I think my Newcastle is looking pretty good!  It's certainly not perfect, but definitely wearable.  Tim seems to like it, which is the key.   Now that I've seen it on him (and tried it on a little while sewing it), I kinda want one myself.  I might have to take a hint from Morgan's tutorial for altering the pattern for the ladies and sew myself one!


Tim requires a beer to pose for pictures.  Not unlike other bloggers who ply their children with candy and stuffed animals, I must ply my husband with craft brews:

Here are my pattern notes, none of which are particularly groundbreaking.  Most of them echo things other bloggers have said:

- I sewed up view A with the smaller collar and the contrasting back yoke and shoulder plackets

- I didn't interface the back yoke or shoulder plackets for fear of excess bulk


- Speaking of bulk: sewing the body, collar and facings all together was a beast! 5 layers of fabric and at least 3 of interfacing (there could have been 1 more, had I interfaced the yoke and plackets)... whoa!

- The sleeve caps were super hard to ease in... lots of extra fabric; mine are okay but a little ripple-y

- I was a little bit confused about the part in the instructions where you deal with the facing and hem... I think I could have used one more illustration.  I wasn't sure what exactly to trim.

- The cuffs are a wee bit large, methinks, disproportionately so... next time I might lengthen the sleeves and shorten the cuffs

- Buttonholes were tough:  I used my automatic buttonhole foot, but had to manually pull the placket through because the feed dogs were not interested in making the fabric move

- I think next time I would use a slightly stiffer fabric like sweatshirt fabric... the ponte might have had a little too much drape for this design and, when combined with the heavy collar and facings, makes the cardigan hang funny when it's not buttoned:

Monday, April 7, 2014

Digital Datura

I'm on a Deer and Doe roll... the hits keep coming!  This is Deer and Doe's Datura blouse.  I love how the Deer and Doe patterns fit me right out of the envelope; no fiddling with bust darts or anything! 


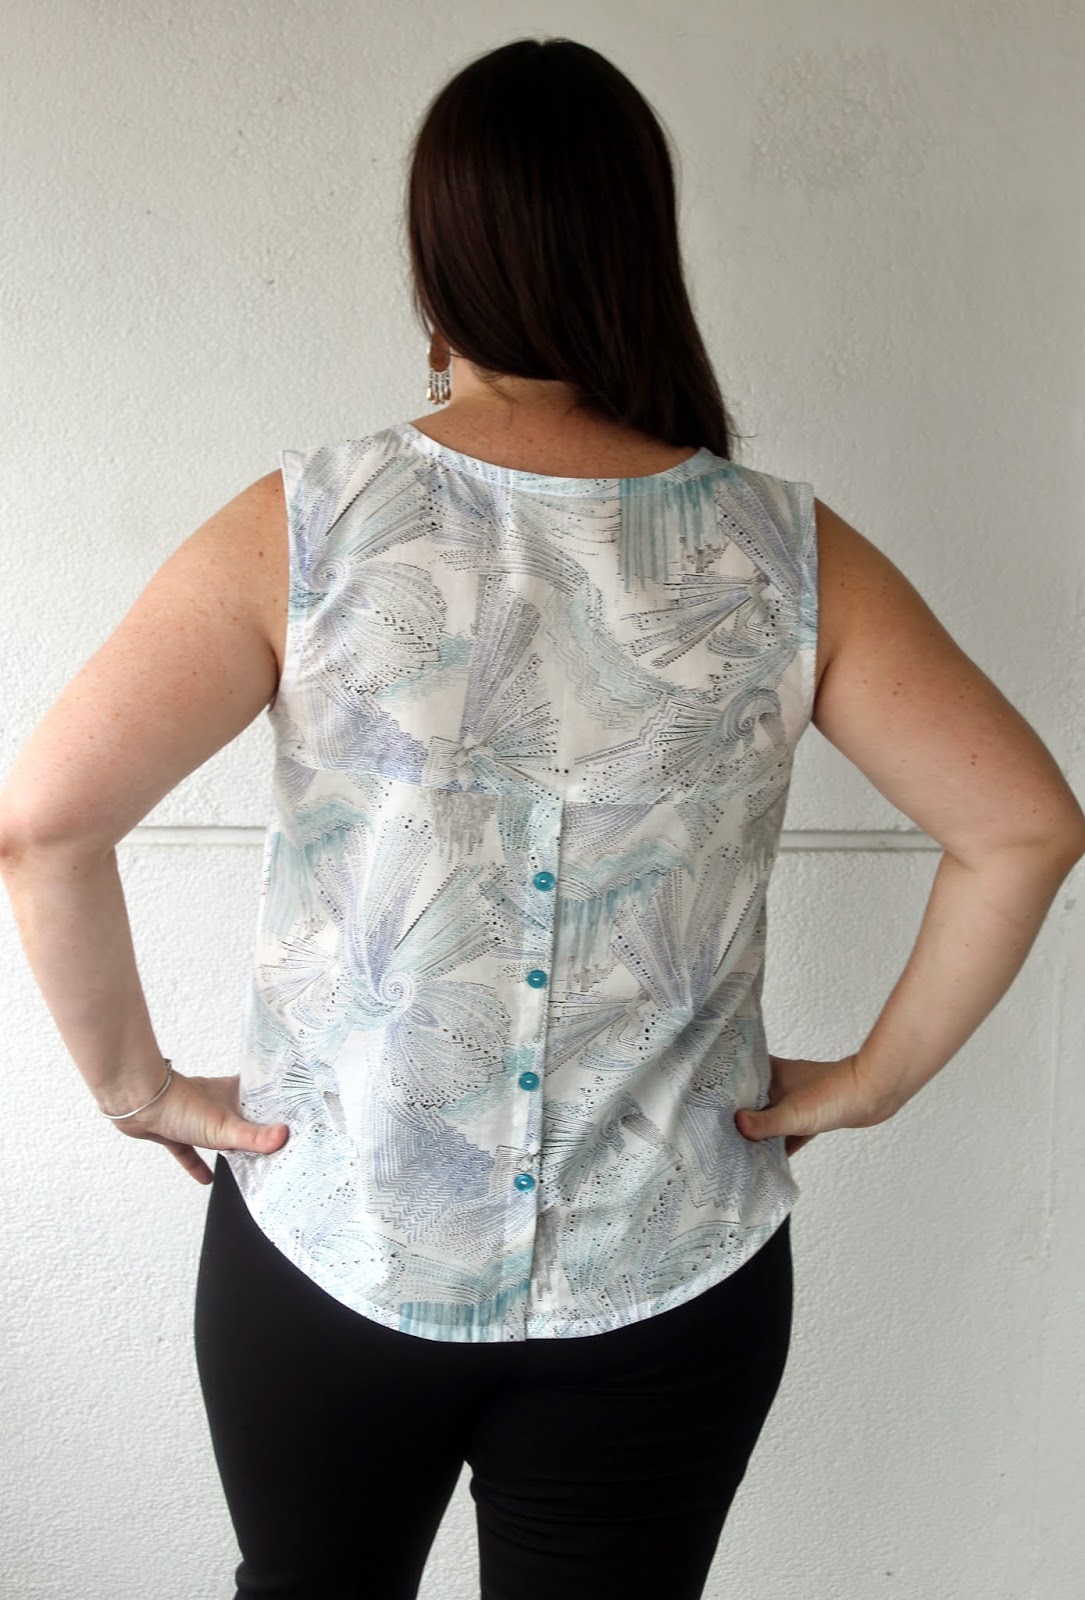
The fabric is a crisp and light Alexander Henry cotton lawn, Dimitrios in blue, which I bought on sale at Hawthorne Threads last year.  It's a cool digital-esque print.  Not sure how to describe it, but the bursts of color are made up of tiny dots and dashes.


I didn't totally follow the directions for this top: I didn't line the yoke because the fabric is somewhat sheer and the pattern was showing through, so I used store-bought bias tape as a facing for the neckline and arms.  I sewed the buttons on the back placket without making buttonholes because I can't imagine I'm going to need to open it much.  Tim helped me pick the buttons- I was going to go with black, but he convinced me that these pearly teal guys were more fun.  


This pattern will be awesome as a color-blocked top, with a contrasting yoke.  I also want to try the cool triangle cut-out neckline at some point.  So many sewing plans, so little time!

Friday, April 4, 2014

Polka Dot Suzy Pants

After seeing so many cute and comfy looking versions of Tessuti's Suzy pants online (in particular, the pairs at True Bias, Boo Dogg and Me, and SallieOh... lovely!), I decided to whip up a pair myself.


Now, did I have an inkling that these might not be the most flattering pants on me?  Yes.  Did that stop me from making them?  No.  Was I right?  Yes.  Do I care?  No.  These things are so comfy that it doesn't really matter that they look like pajama pants on me.  Tim, on the other hand, had this thought that he said out loud: "Those are for around the house.... right?"  Ha.


I do kinda wish that I had done the flat front waistband alteration that Kelli and then Sallie did... I may go back and change that eventually, which might help the look a little bit and prevent the rolling elastic thing I've got going on.

I made them with some green polka dot rayon challis that Martha provided from her stash (thanks, Martha! also: what's with me and polka dots these days?).  I skipped the pockets, per the tutorial on Tessuti's website (let me explain... no, there is too much... let me sum up: don't add pockets, sew straight up side seams), but otherwise made them according to the instructions.

Everyone wants a photo of their butt in the interwebs, yes?
 Please note my attempt at the casual "partial tuck" for my t-shirt.  I am not sure I achieved the correct look... it looks so cute when I see it in magazines and such, but when I try it, memories of soccer practice in 4th grade flash through my mind: an oversized t-shirt tucked only in the front, just so, into a pair of multi-colored fluorescent Umbro shortsAnyone? Anyone? 

Thursday, April 3, 2014

Floral Sureau Dress

After my (many, many) successes with Deer and Doe's free Plantain pattern, I bit the bullet and ordered some more Deer and Doe patterns from their shop.  Their plan worked!  I am now a committed D&D customer.  I bought Sureau, Datura and Belladone, specifically. 
First up: Sureau!


I thought there were lots of similarities between the Sureau pattern and Megan Nielsen's Darling Ranges dress, but I was hoping that my Sureau wouldn't ultimately be balled up on the shelf out of frustration like my attempt at Darling Ranges.  I abandoned my Darling Ranges after some seriously wonky dart issues and haven't had the guts to tackle it again.  In contrast, the Sureau bodice fit right out of the envelope... win!  It's hard to tell in the print fabric, but here's a zoom-in on the bodice front and back:


I didn't make any changes to the pattern with the exception of lengthening the skirt slightly (2", because I am an old lady) and using a shorter zipper (9", because that's all I had in the appropriate color).  Also, I stay-stitched the neckline at the beginning to make sure it didn't get bent out of shape (good thinking, Meg, pat on the back.). I left off the bodice buttons because I was concerned that it was veering in the Little House on the Prairie direction, which nobody wants (ok, maybe somebody wants it, but not me).  The fabric is a lovely cotton floral from BelleBoo here in Bangkok.

I like it best with a belt:


I like this pattern a lot: the bodice is great and pretty flattering, methinks.  The sleeves may be a leeeetle baggy, but nothing terrible. I am already scheming about what other ways I can use this bodice since it fits so well!!  I wonder how it would look:

a) with short sleeves (this short sleeve version from the Nerdy Seamstress looks pretty awesome);

b) in a solid fabric to show off the bodice gathering details more;

c) as a peplum top (the pattern envelope has a drawing of a peplum top, but no "cut here for peplum" line or any instructions.... I wonder if I could substitute a more circle-skirt style peplum from another pattern, like Hawthorn or Vogue 8815?)

Tuesday, April 1, 2014

Skater Twins!

Matching dresses for the girls made from Kitschy Coo's Skater dress pattern (the little girl version of the top I made a few months ago): good stuff!  Making the adult version made me want to make the child version, and now, having made the child version, I want another go at the Lady Skater.  Putting it on the list...


I used this soft pastel knit fabric that I stole from Martha's stash.   It definitely looks like an '80s-era purchase with the paint splatter effects and pastel colors.  It's not something I would likely purchase myself, but still very cute and pretty (and free! Thanks, Martha!).  I've got approximately 9 miles more of it, so this is not likely to be the last you'll see of it.


Construction wise, the only change I made was to sew the neck-band together as well as the shoulders before attaching them, as that's the way I've done it successfully in the past.  

The little dresses look so cute!  Can't wait to see them on the girls... and I'm sure they can't wait for the warmer weather that will allow them to wear the dresses!