Monday, June 30, 2014

Floral Charlotte

Since my Me Made May adventure revealed that I need more me-made bottom coverings, I decided to sew up By Hand London's Charlotte skirt:


I used a floral printed stretch bottom-weight... maybe it's technically denim?  I got it from a local fabric store here in Bangkok, Hieng Yoo Huat.  Not sure why everything I am posting this week is pink, considering pink is not normally my jam, but here it is, in all its rosy glory!:


I shortened the length by about 7 inches by very scientifically holding my Colette Mabel pattern pieces up to it.


My two issues: one, for some reason my waistband was very short as compared with the skirt, so rather than having a couple of inches of overlap, I only had about one inch.  Hmmm.  Not sure what happened. Next time I'll have to lengthen it and maybe widen it, too.


Two, I am getting some poofiness in the front area, not necessarily when standing still, but when I walk, the fabric bunches up. You can kinda see the weird hip-to-hip horizontal wrinkle below, although the print obscures it a bit.  Any thoughts on how one might go about fixing this problem?  When I look at images of other ladies in their Charlotte skirts, it appears others may have a similar problem, to varying extents.


I'm pretty happy with my Charlotte!  I'll definitely have a few improvements to make on my next iteration, but it's a pretty cute and wearable skirt as is, too!


Saturday, June 28, 2014

Summer Jazz Dress

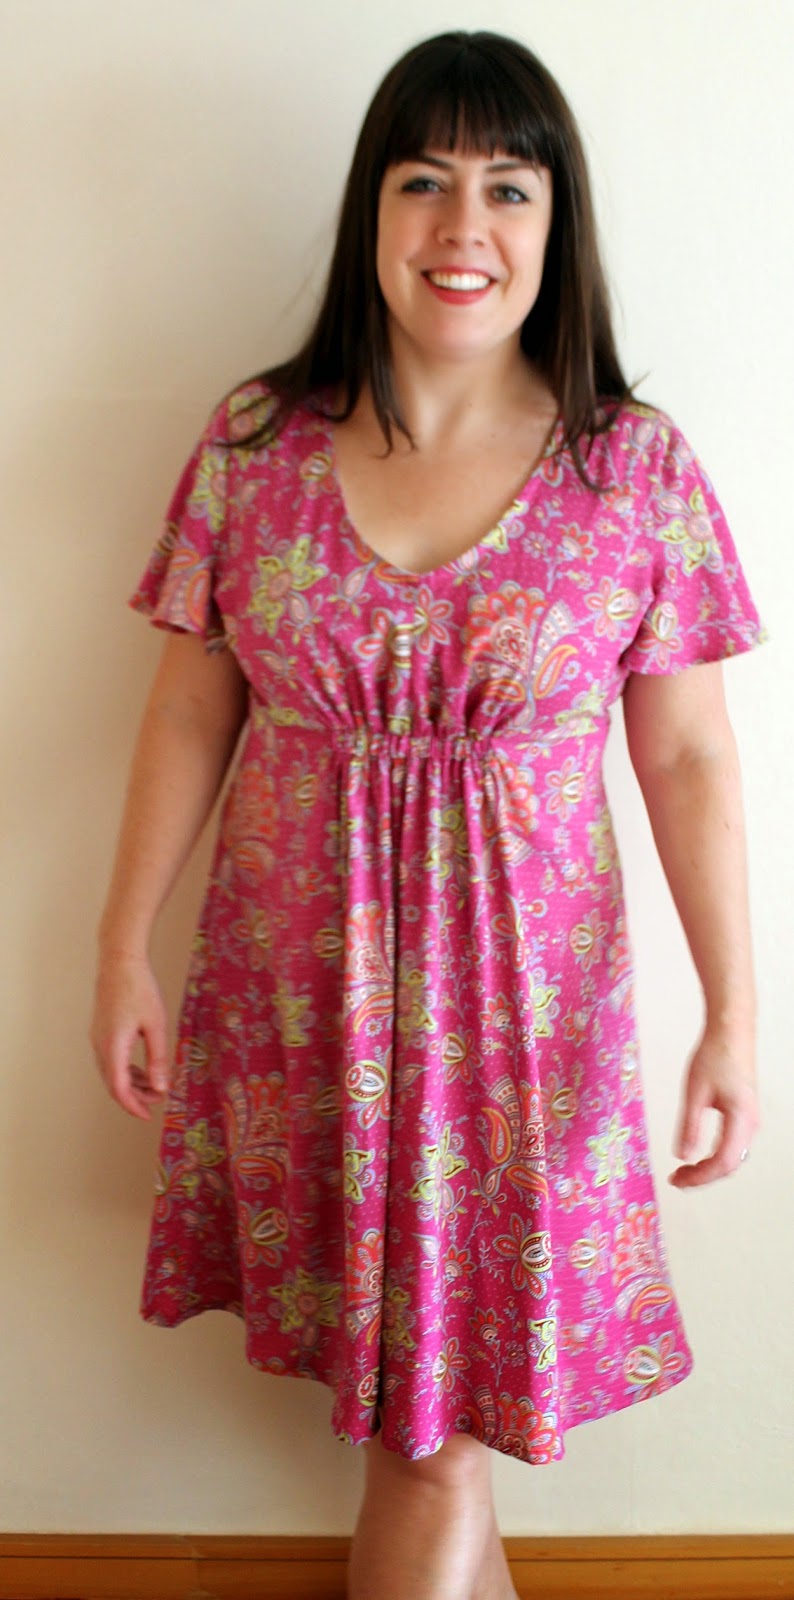
I can't remember where I first caught a glimpse of the Snapdragon Studios' Summer Jazz Dress, but I do remember thinking "It shall be mine."  The ladies at Snapdragon Studios had given a sneak peek of the dress back in May, but released the pattern as part of their first collection a few weeks ago... I snapped it up pretty quickly, printed it out and got to sewing.


I loved how relaxed and flowy the dress looked.  It's perfect for, as the designers describe, a summer jazz concert (Oh, DC, how I miss your Friday jazz in the sculpture garden!), but also for throwing over a swimsuit at the beach, heading to the farmer's market, etc. etc. I like the shirt/tunic version, too, for pairing with leggings or jeans.  The neckline was one of the features I really liked: a soft, pretty v-neck.


I decided to make mine out of a rayon challis I have had in my stash for a while: Amy Butler's Sari Bloom.  This stuff is super slippery, silky and soft.  Kind of a pain to sew with due to said slipperyness and also because it shreds like a mofo, but the silky softness wins out.  I feel like rayon challis is the perfect fabric for this dress: it maximizes the drapiness of the sleeves and skirt.  Good stuff.

The logistics of making the dress:

- My bust measurements put me squarely between 2 sizes and I couldn't find finished garment measurements, so I queried the designers to see what they recommended. They thought perhaps I should go down a size and I probably should have listened.  I chickened out for fear of having a too-small dress and went for the larger size.  It's a bit roomy... d'oh!!  Why, Meg, why did you not listen?!

- Soooo, to make up for the extra fabric, I pulled the elastic significantly shorter in the front; I cut it from 9 to 5 inches.  Then I unpicked the darts in the back, cut another elastic casing, and mirrored the elastic gathering in the back, albeit slightly less tight (more like 7-8 inches).  I think it worked pretty well and stayed true to the style of the dress, but gave it a bit more shape in the back.  Next time I'll definitely size down, but I might maintain my elasticized back because I like the symmetry of it.


- Honestly, I had some trouble understand the neckline finishing instructions in the pattern. Instead, I ended up following this tutorial for mitering inside corners with a bias tape facings. Worked pretty well!  I used store-bought bias tape because I was worried making and working rayon bias tape would be the death of me... so fiddly!


- Hemming the sleeves was a chore because they are so round, kinda like a circle skirt.  I couldn't get them to turn under twice without being a lumpy disaster, so I went with a slightly uncouth method: serged the whole hem then turned it under once and stitched.  Gets the job done, but maybe not the prettiest method!


All-in-all, I am pretty pumped about this dress despite my silly sizing mistake.  It's so flowy and comfortable and flattering!  Tim and I are heading to the beach for 4th of July weekend and this dress will definitely make an appearance for shoreside cocktails.


Monday, June 23, 2014

Rainbow Dots Moneta

I might be the last person on earth to make Colette's Moneta knit dress, but I am so happy I finally decided to go for it... I wasn't sure I neeeeded to buy the pattern when it first came out considering I already had another knit dress (the Lady Skater), but after seeing approximately 10,000 gorgeous Monetas spring forth on the internets and learning that there was going to be a sewalong, I pulled the trigger and bought the pattern. Glad I did, too, because Moneta is pretty amazeballs. It's a great blank slate, it's a comfy but classy staple, it can be made in just a couple of hours...


My favorite parts of this pattern:


The lovely neckline... when I tried on my finished Moneta, I couldn't remember which side was the front and which was the back. It looks pretty good both ways! Turns out the lower neckline is the back, which is fairly unusual.

The revolutionary (at least for me) waistline shirring method using clear elastic... mind blowing.  Mine is not perfect (I seem to have some ungathered areas where I held the fabric to stretch out the elastic), but I am confident that next time it will be. This method is easy and makes the waistline feel secure. I'm not worried about it stretching out with the elastic in there!


This fabric:

Did I originally buy it to make something for my nieces?  Yes. (There's a little leftover, enough for a t-shirt or something for one of the girls, so I don't feel that bad.)


Did the cutting lady at Joann make fun of me for buying the fabric since it's a bit eye-searing?  Yes.(Don't judge, lady, just cut. Preferably straight. I've got my eye on you.)

Do I love it anyway?  Yes. (It's so fun!)

I do love this fabric, although I noticed when cutting it that the dots are totally off-grain. I didn't bother with pattern matching for that reason.  Plus, if you try to look at the fabric too closely for too long, your eyes start to go blurry and you feel a little lightheaded.  So best not think too hard about whether the dots are running straight or matching, right? Right. 


Looks good with my orange belt, too, methinks. Hooray!


Saturday, June 21, 2014

Happy Homemade Sew-along: Pull-over Parka

When I read that elsiemarley and you&mie were doing a sew-along for one of patterns in the Japanese sewing book, Happy Homemade: Sew Chic Kids, I was pumped because I had purchased this book months ago on a whim but hadn't worked up the nerve to sew anything in it. When I read that the pattern they chose to sew was the pull-over parka, I was doubly pumped, because that was my favorite!


Why was I too intimidated to try one of these patterns?  Because, even though I purchased the English version of the book, the language doesn't matter much since the instructions are pretty much the sewing equivalent of Ikea instructions... all diagrams and arrows and craziness with very little in the way of text directions. In the end the parka really wasn't very hard to put together, but I am super grateful for the hand-holding from the sew-along!


I made Miss Z parka using some quilting weight cotton I bought at Belleboo here in Bangkok... when I bought it, I thought to myself, "Oh, cute alphabet/animal fabric. Score!" But when I got it home, I discovered its quirk: it is not the full alphabet, by any means, but inexplicably only the letters B, E, F, L and G, repeated over and over.  Ha!  I went back to the store and took a closer look at their fabrics... pretty much anything with words on it had a typo or translation issue of some variety or another.  I'll keep that in mind for the future ;-)  The fabric is cute anyway, so I am not too worried about the limited letters.


I decided to break up the print a little bit with some hot pink piping on the raglan sleeve seams. I love how it looks and was thinking I should have used more, but it did make things a bit fiddly when binding the hood/neckline seam. 

The hoodie/parka came out pretty cute!  Can't wait to see it on Zoe...


Monday, June 16, 2014

Hudson Pant: Pattern Testing

I was quite excited to be chosen as a pattern tester for the brand spankin' new Hudson Pant pattern just released by Kelli at True Bias.  I admire Kelli's casual chic style and envy her Botticelli-esque hair, thus I was totally pumped to hear she was coming out with her own sewing pattern...  plus, stylish sweatpants?  Yes, please!  My overworked yoga pants breathed a sigh of relief upon being replaced in my weekend line-up by the Hudson pant.


I sewed up the cropped/calf-length version of the Hudson pant, figuring I would get more wear out of the shorter ones here in Bangkok where rainy season is ramping up, necessitating short pants.

For fabric, I went with a fairly stable jersey knit (the same nubby grey I used for Tim's Strathcona tee) for the main part of the pants and a black french terry (same as my Mabel skirt) for the waistband, pocket detail and calf bands.  Perhaps, in retrospect, I should have used something with better recovery for the calf bands, as they get a bit saggy after wearing...  


I found the pattern to be really easy to put together: the instructions were great, the pieces seemed to come together easily and as described, the fit was spot on based on my measurements as compared to the chart...  

When testing, I only had a few things that I found could be improved, the main two being that the numbers and circles used to line up the pattern pieces could be darkened to make it easier to tape together and that the pockets were a bit bunchy/sticky-outy (I realize that is not a word, but for the life of me could not come up with a better way to describe it!).  Kelli has made updates to the final pattern to address both of these things, which is great, so I plan to make another pair in the near future!

My Extended Me Made May Challenge: Me Made Living

Welp, I've completed my extended Me Made May challenge, which was to wear hand made for the first two weeks of my new job.  Success!  I'm going to categorize my extended challenge as an exercise in #memadeeveryday and #memadeliving

This was pretty fun for me since I got to wear many of my me made garments for the first time... and there really wasn't a dud in the bunch.  I was particularly happy with my dresses, Sureau and Emery... comfortable, quick and easy to throw on in the morning (no matching!).  Good stuff.

Holes I found in my professional handmade wardrobe: solids.  I need basic solid pieces, bad.  In particular, a solid black top, some solid pants to wear with all of my printed blouses...  And while I'm at it, I might add a few more work-appropriate dresses, too.

Week 1

My batik New Look 6808, plus bonus cat:


Digital Datura blouse, plus bonus Tim:


Forgot to take a photo on Friday of Week 1, but I wore my ikat Victoria blazer.

Week 2

My polka dot Josephine, plus cat lurking in the background:


Ikat Tiny Pocket Tank under the blazer:


Wednesday, June 11, 2014

Vogue 8904: The Shingle Dress


Based solely on the pattern as modeled on the envelope, I would never have given Vogue 8904, a Marcy Tilton designer pattern that she calls "the shingle dress", a second look.  A pencil-thin, hipless model in a sheath dress?  I just couldn't picture how it would ever look good on me, a far from hipless woman.  However, after seeing a bunch of Vogue 8904 dresses pop up on sewing blogs and in light of the fact that the pattern was voted one of the best of 2013 on Pattern Review, I gave it that second look. Lots of women with curves were posting pretty bangin' photos of themselves in this dress (case in point: Manju over at Sewmanju), so I figured it was worth a try!


And worth a try it was! I love it, even more than I thought I might!  It's super comfortable, first. Second, the "shingles" sorta float over your love handles, etc., so it's very forgiving and not at all clingy. And, third, I think it's just pretty damn cool looking.  I think in the stripes it's really interesting and eye-catching, but I think it could be a really awesome basic dress in a solid color or a fun statement dress if you did some pattern mixing. 

Sleeveless + gladiator sandals = summer concert dress.  
Sleeves + heels = comfy but classy office wear.  

If you need more convincing that this pattern is a good buy, check out how much they are charging for very similar dresses at Anthropologie. I think mine ended up costing less than $20.


I made up view B, the longer, sleeveless version in a striped cotton jersey knit (maroon with white and black stripes) from L.GEMini here in Bangkok.  My fabric choice may have been a little bit heavy for this dress; it's like a t-shirt weight. Since the whole dress is double layered (and where the "shingles" overlap, triple layered), things got a bit bulky.  But it's definitely still an awesome and totally wearable dress.  Next time I might just choose a thinner jersey... even some of those jerseys I bought on the internet and have since set aside for being too sheer (I feel like lots of internet fabric shoppers find themselves in this boat occasionally?) might work quite well with this pattern.

Ok, dress construction:


This is basically a 2 piece knit sheath dress with 10 "shingles" of fabric sewn on top of the inner sheath dress (5 in the front, 5 in the back). I basted together the inner dress to make sure the fit was ok before cutting out the shingles, because there are so, so many of them, so cutting them in the wrong size would be disastrous!  I actually think this pattern would be worth buying on sale just for the basic sheath dress pattern sans shingles- it's got a really nice hourglass shape to it.


I cut everything on a single layer of fabric, which worked well to help get the stripes right.  I wasn't too precise about lining up the stripes at the side seams, but it worked out that they matched up 90% of the time anyway.  Mostly, when cutting I tried to make sure one of the thicker black stripes was running along the bottom of each shingle.  Cutting on the single layer helped with saving fabric, too, I think.


Like I said, lots of layers- super thick on the seams, plus a 5/8" seam allowance, so I used a zig zag stitch on my machine, then pressed the seam allowances open and finished them with the serger.


I attached the neckline and arm bindings after putting the shoulder and side seams together, kind of like a t-shirt binding.  Then I topstitched them down, but I think I may have stretched the bindings out slightly at that point. Eh, no big deal: 


The pattern calls for leaving all of the hems unfinished.... the part of me that likes everything in its place is freaking out a bit over that, but the part of me that is lazy is like "Yessssssssss!!!!"  My hems (all 10 of them) are curling a bit, but I think it adds to the texture and attitude of the dress, so I am trying to be cool with it and not obsessively smooth them downward.

Here's me wearing my dress on the last day of Me-Made-May, out for a beer:

Monday, June 9, 2014

Plantain Party! Plus Bonus Soleil Dress

More of Deer and Doe's Plantain t-shirts!  Not for me, though, this time... sharing the wealth!

Check out these hot ladies in the Plantains I made for them!  I made these months ago and sent them across the world, but weather and timing only cooperated for them to take photos in the Plantains this past weekend... totally worth the wait:


Bonus me-made in the photo is Z in the heart-y Soleil dress I made a few months ago:


I actually made the Soleil dress for her younger sister, but it fits Z this summer, so it's on loan to her.  Looks like she also helping her sister open birthday presents here:


Wearing Soleil for some playground action:


Ok, back to the Plantains: I made a short-sleeved version for Chuck made from slinky and sheer teal and grey burnout cotton jersey from Girl Charlee, which is no longer available in teal, but is available in summery lime and orange.  Watch out when using this stuff, though, as we ended up with turquoise fuzz on everything that came near it!. 


A three-quarters length sleeve version for Martha out of this funky cotton and rayon knit from Joann's Red Tag area...


Love this pattern!